



Assignable Controllers
This article is all about something called assignment. The standard definition of the word in most dictionaries goes something like this: "To allocate (as in a job or duty)."
When most people think of assigning something, they think of delegating a task — assigning your child a chore to complete, or assigning an employee to do a particular job. When it comes to the Yamaha Genos2. flagship workstation, the concept isn't all that different: you assign functions to controllers such as a button, a knob or a slider. In other words, you're telling Genos2, "When I press or move this button/knob/slider, I'd like it to execute this task."
Genos2 features an expanded Live Control surface with nine assignable buttons, six assignable knobs (each with an LED gauge to show you its position at a glance), and nine assignable sliders (also with LED gauges). There's also a new "catch" function on the knobs and sliders that reduces the risk of accidentally changing a value mid-performance. Each controller comes with a factory default assignment, but you can tell any of them to do something different. Here's how:
How to Change Button Assignments
Let's start by assigning a function to one of Genos2's ASSIGNABLE buttons:
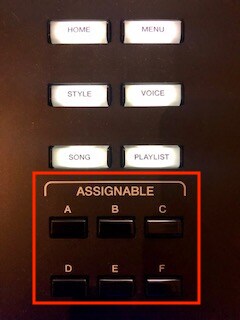
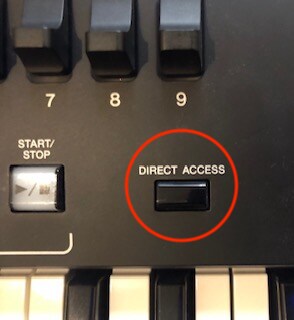
You begin the process by holding down the DIRECT ACCESS button and pressing the button you want to reassign:
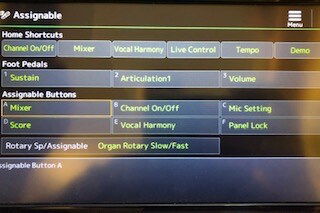
This will take you to the Assignable menu screen, which shows all current assignments for not only the buttons but the Foot Pedals and Home button shortcuts as well. By default, Yamaha has already assigned the ASSIGNABLE buttons to commonly used functions. As you can see in the photo below, ASSIGNABLE button A is assigned to Mixer, while B is assigned to Channel On/Off, etc.:
But let's say that instead of calling up the mixer, you would prefer to have quick access to editing your Voices ("Instruments," in Yamaha lingo). Simply highlight the Assignable Button A field (which should already be highlighted by default), then touch that field. You'll see the list expand with 13 pages of functions which can be assigned to the highlighted button. Touch the onscreen down arrow below the page ratio, and go to page 3 of 13 (3/13), then select Voice Edit:
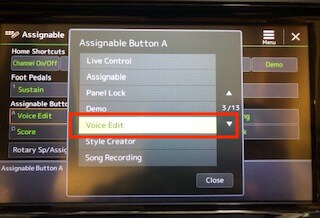
Now touch Close to execute the action. Done! Now whenever you press ASSIGNABLE button A you'll be taken directly to the Voice Edit menu. Follow the same steps to change the assignments for the other ASSIGNABLE buttons.
Having a dedicated button really is a time saver. Before this reassignment of ASSIGNABLE button A, accessing the Voice Edit menu required three button presses (Menu, onscreen Menu 2, then Voice Edit). With this change, it only takes one!
How to Change Knob Assignments
Let's move on now to changing the assignment of a knob. You'll notice there is already a dedicated physical button labelled KNOB ASSIGN:
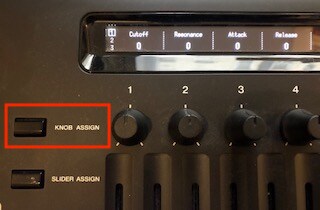
You might well think that this is used to assign a particular function to one of the knobs, and you wouldn't be far off. What this button actually does is cycle through the three pages of current knob assignments. These can be seen in the Live Control view on the Sub Display — the dedicated strip above the knobs. Keep pressing the KNOB ASSIGN button and you'll see that the display goes from page 1 to 2 to 3 and then back around to 1 again. That means you can have 18 different knob functions at your fingertips at any given time.
Assigning one or all of the knobs is as simple as holding down the (you guessed it) DIRECT ACCESS button and pressing the KNOB ASSIGN button. You will now be taken to the Live Control screen where you get a comprehensive look at all the Knob and Slider Assignments:
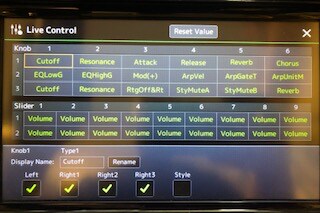
Let's start by reassigning Knob 1. As you can see, Knob 1 (shown onscreen in page 1, row 1) is currently set to Cutoff. Maybe you'd rather have quick access to changing the Portamento Time instead. To do so, simply highlight the Cutoff field onscreen (it should already be highlighted by default). Touch it and you'll see the "Knob 1 – Type 1" menu appear. Touch the onscreen down arrow directly below the page ratio and go to page 3 of 5 (3/5), then select Portamento Time:
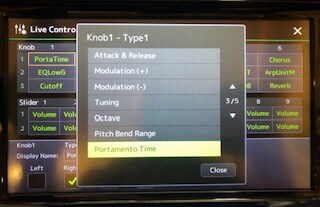
When you touch Close, instead of the Sub Display showing Cutoff for Knob 1 Page 1, it shows PortaTime:
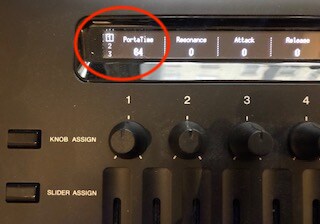
Again, you can use the same procedure to change the assignments for all six ASSIGNABLE knobs.
How to Change Slider Assignments
Now let's change the assignment of a slider. One of the coolest things about Genos2 custom assignments is being able to assign a function normally reserved for one kind of controller to a different kind of controller. So with that in mind, let's assign one of the sliders to panning — something usually accomplished with a knob.
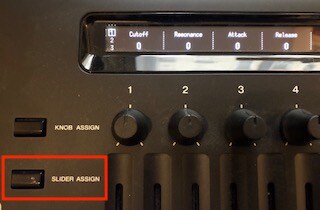
Start by holding down the DIRECT ACCESS button and (yes, you guessed it again!) press the SLIDER ASSIGN button:
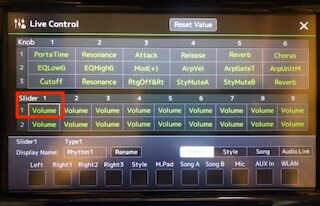
You'll find yourself in the Live Control screen once again. Highlight Slider 1 (in row 1 — it should already be highlighted) and touch it:
The "Slider 1 – Type 1" menu will then appear:
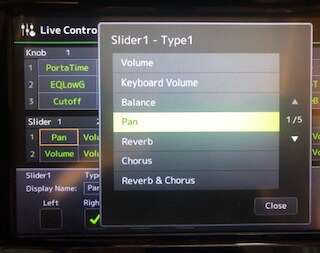
Volume will be selected, which makes perfect sense since that's what sliders are usually used for. Select Pan instead and touch Close. Now the Sub Display shows Pan instead of Rhythm1 Volume:
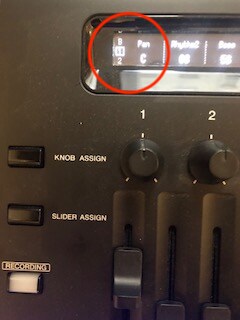
Grab that slider and experience a whole new way of panning! Yes, some might argue that a knob is a more intuitive controller for panning, since when you turn it to the left it moves the signal to the left and when you turn it to the right it moves the signal to the right. That said, there are engineers who prefer using sliders for functions other than volume. In the end it's all about what feels right to you.
As before, the same process is used to change the assignments for all nine ASSIGNABLE sliders.
How to Rename Assignments
If you'd like to personalise your Genos2 experience even further, you also have the option of renaming your assignments. (These personalised names will be displayed in the Sub Display strip.)
To do so, simply highlight the name of the assignment you'd like to change (I'm using PortaTime for this example) and touch the onscreen Rename field:
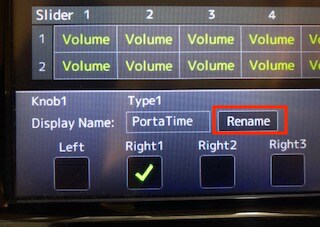
The onscreen keyboard will appear:
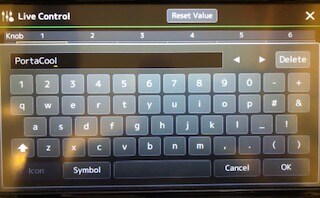
You can rename assignments any way you'd like, as long as there are no more than nine characters. (For this example, I'm going to rename the assignment "PortaCool.") When you're finished, touch OK in the lower right-hand corner, and enjoy your newly personalised name assignment:
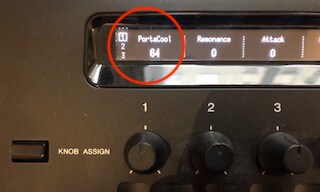
So go forth and assign to your heart's content. It's one of Genos2's most useful shortcuts, and with some practice I think you'll find it will greatly streamline your musical workflow. And — with the possible exception of Daylight Saving — who doesn't like to save a little time?
All photographs courtesy of the author.
* Compatible instruments include: Genos 2, Clavinova CSP and CVP series, PSR-SX keyboards.
